
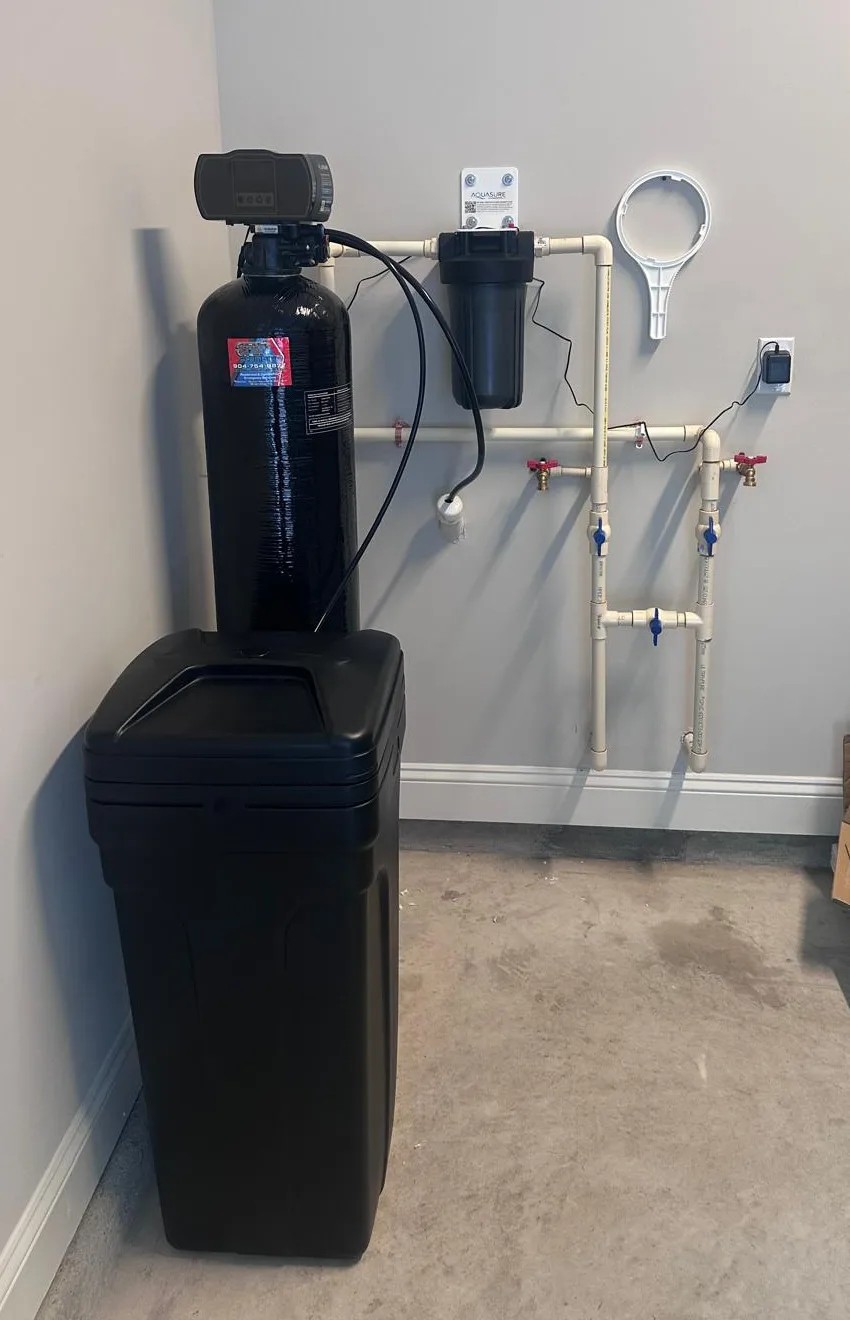
This is a whole-house water softener with a sediment pre-filter, installed in a garage here in Northeast Florida. If you’re thinking about treating your water, here’s what every part in the photo does and why we plumb it this way.
Why treat the water at all?
Much of Florida’s water comes from limestone aquifers, so it carries a lot of calcium and magnesium [1]. That hardness is what leaves white crust on faucets, spots on shower glass, and scale inside your water heater. A softener removes those minerals before they reach any fixture in the house.
The parts, one by one
1. Sediment pre-filter (on the wall)
Water passes through this filter first. It catches sand, rust and grit so they don’t foul the softener resin or the valves downstream. The white wrench hanging next to it is for opening the housing when it’s time to change the cartridge.
2. Resin tank with control valve (the tall black tank)
This is the softener itself. It’s filled with resin beads that trade hardness minerals for sodium as water flows through, a process called ion exchange [2]. The digital head on top tracks how much water you use and decides when to clean (regenerate) the resin, usually overnight.
3. Brine tank (the box in front)
This holds the salt. During regeneration, the control valve draws salty brine from this tank to rinse the minerals off the resin and recharge it. Your only regular job is keeping it topped up with softener salt.
4. Bypass loop (the blue-handled valves)
Three valves let you route water around the softener in seconds. If the system ever needs service, the house keeps running water the whole time. Not every installer takes the time to build one; we always do.
5. Sample valves and drain line
The red-handled valves let us draw water before and after treatment to check that the softener is working. The small drain line carries the rinse water from regeneration away.
What you notice after the install
- No more scale on faucets, shower heads and glass doors.
- Softer feel on skin and hair, and laundry that comes out less stiff.
- Less soap and detergent needed to get a good lather.
- A longer life for your water heater, dishwasher and washing machine.
Keeping it running
- Check the salt level every month or so and refill before it runs low.
- Change the sediment cartridge when water pressure starts to drop, or at least once or twice a year.
- On well water, ask us about well water treatment. Iron and sulfur may need more than a softener.
Want to know if a softener makes sense for your home? See our water softener and whole-house filtration pages, or call or text us at (904) 754-9877. You’ll talk to the owner directly.

Licensed Florida plumbing contractor (CFC1434171) with 20+ years of experience.
- U.S. Geological Survey, Hardness of Water
- Penn State Extension, Water Softening